Weekly WaveShine #4
Free Camera Movement and Unreal Project Architecture Overview
Hello, and thanks for stopping by for the this week’s entry in my Weekly WaveShine series! In this week’s entry you can look forward to:
- A look at the simple camera movement I’ve implemented [Go To]
- An overview of the architecture that I currently have in place for my Unreal side project [Go To]
Want more or to read up on bracket design? Check out last week’s blog entry or my most recent entry!
Unreal Project: Simple Camera Movement
I’m currently working on a project in Unreal that I’ve provisionally named Metal Wings. I’m maintaining a few different pieces of documentation for this project:
- Game Design Doc (GDD) – I wrote this because I felt it would be a good way to communicate my thought process and overall intent. I also find it’s just a nice way to help me organize my thoughts and get closer to a concrete action plan.
- Vertical Slice Spec – This document is a rough spec for a vertical slice that I feel will demonstrate the core idea behind the design and require the implementation of many of the most important systems within the game. In a team setting, this would probably be something I’d bring as a starting point for Sprint Planning to review with the team and start breaking out into Epics/User Stories/Tasks/etc.
- Source Code – I’m currently tracking this project on GitHub. I’ll need to figure out how to handle assets that I can’t share publicly, but for now, the repo is public since it’s all just free assets and my code. I am being super awful and just maintaining a dev stick-branch and merging into main as I complete notable features. Just to be clear I know how to branch on feature and am choosing not to because it’s just me working on the project.
This week, I’ll be covering the simple camera movement I’ve implemented. It’s nothing complicated, but I wanted to implement it in a way that would be extendable and suitable for continued development. I’ll go into a deeper dive on the architecture and implementation details but for now, I wanted to focus on the actual behavior itself and notable features it provides for adjustment and iteration within the Unreal Editor.
Feature Overview
Per the vertical slice spec, the camera will need to exhibit the following behaviors:
- Camera sits at a fixed height and angle. Later feature may enable some limited zooming in and out.
- Player can pan the camera around by moving the mouse cursor to the edges of the screen.
- Player can set radius for camera movement safezone
- Moving closer to the edge of the screen causes faster camera movement.
- Player can set max camera move speed within a range.
- Camera can only move left/right or up/down. Figure out handling for corners.
- Player can also pan the camera around using the arrow keys.
- This is the equivalent of placing the cursor at the corresponding edge of the screen with max camera move speed.
So for this increment, I focused solely on panning the camera around using the arrow keys. I kept the other related features in the back of my mind and did my best to ensure the implementation would support these various configuration options.
The current implementation provides the following:
- The up, down, left, and right keys cause the camera to begin moving in that direction relative to the camera’s initial orientation along the world XZ-plane.
- There is a max speed the camera can reach in either direction, and the camera accelerates to reach this speed. This helps make the movement of the camera seem smoother.
- This max speed and the acceleration can be configured in the blueprint.
- There are also methods to stop the movement of the camera. It can use a separate configurable braking acceleration or it can brake immediately.
- The camera will stop moving if its position would exceed the minimum or maximum values set by configurable vectors representing the bounding points.
- While it might be desirable to add in handling for more complex boundaries in the future, for the sake of this increment and the vertical slice, this should also be sufficient.
- The camera’s initial orientation and position can be set in the blueprint.
Free Camera Movement
Just a quick clip of what the movement looks like. Nothing ground breaking, but baby steps!
Thus, it’s reasonable to say that the player is able to pan around using the arrow keys as detailed in the Vertical Slice Spec. While not the most revolutionary of behaviors, it was definitely a good starting point to start getting more familiar with Unreal and the architecture that’s in place within the game. You can see more about this in the section below.
Unreal Project Architecture Overview
Division of Concerns
When implementing this feature, I definitely covered a lot of ground in terms of key systems within Unreal, and I wanted to ensure that the implementation accurately separates out the different concerns needed to implement both this feature and features in the future. Here’s an overview of the different parts of this implementation and what they’re responsible for:
- Game Mode – The Game Mode is responsible for instantiating and initializing any critical actors. In this case, it creates a Camera Actor that contains the Camera Component representing the camera pose for the free camera.
- Player Controller – The Player Controller is the representation of the player’s agency within the game. It owns a Ability System Component as well as an Enhanced Input Component. It is responsible for initializing both of these things into valid starting states on the first in-game tick.
- Camera Actor – The custom Camera Actor contains both the Camera Component representing the camera pose for the free camera as well as the custom Movement Component that implements the actual math and logic for moving the camera pose.
- Input Action – A representation of the player’s inputs for moving the free camera. This abstracts away the actual specific keys that are pressed, making it easier to provide functionality for remapping them later on.
- Movement Gameplay Ability – This is a custom Gameplay Ability from Unreal’s Gameplay Ability System (GAS). It is a representation of the player’s intent to move the free camera from a gameplay perspective. It binds together the Input Action and the value it contains to the behaviors that should occur as a result, specifically the Camera Actor and it’s custom Movement Component.
- Movement Component – This is a custom Movement Component that implements the configurable acceleration-based movement and the boundary checking to limit the range of motion of the camera pose. It knows how to move, but it doesn’t know how far or fast it is supposed to move.
- Test Pawn – A custom pawn that’s used as a placeholder just so that the Player Controller actually has something to possess. This has a it’s own Camera Component, and I’ll go into why I use a separate Camera Actor instead of the Camera Component that’s present on the Test Pawn.
You can see this laid out in a slightly hideous but hopefully effective diagram below. You might be wondering why this is all so complicated and whether I’ve over-engineered my solution. The answer to this is that I want to be good at my job. I could hack together something simple, but I ultimately intend to work for AAA teams making large and complex games which will require robust, sustainable solutions. If all I know how to do is to hack things together, then even if I were to somehow land a job working for a AAA studio, I’d be a huge waste for my team. So is this too much for the sake of this individual feature? Probably. For the sake of this vertical slice? Probably not. For the sake of improving and actually gaining useful skills and knowledge for my career? Definitely not.
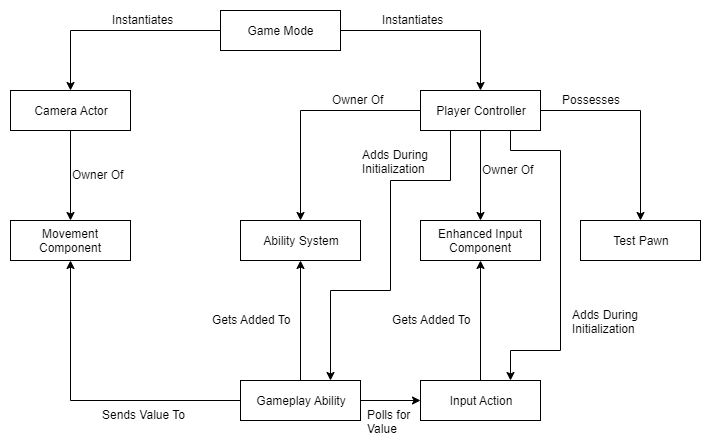
Architecture Diagram
I promise I know how to make things pretty. This is not one of them.
You might be wondering why this is all so complicated and whether I’ve over-engineered my solution. The answer to this is that I want to be good at my job. I could hack together something simple, but I ultimately intend to work for AAA teams making large and complex games which will require robust, sustainable solutions. If all I know how to do is to hack things together, then even if I were to somehow land a job working for a AAA studio, I’d be a huge waste for my team. So is this too much for the sake of this individual feature? Probably. For the sake of this vertical slice? Probably not. For the sake of improving and actually gaining useful skills and knowledge for my career? Definitely not.
Game Mode
Right now, the Game Mode is implemented as a blueprint. I might implement this as a custom C++ class if initialization becomes more complex and maintenance of overall game state starts to become unmanageable. I hope to keep this all decentralized, but we’ll see as development progresses. The key responsibilities of this part of the architecture are:
- Instance Camera Actor – The Game Mode just instantiates a Camera Actor from the blueprint for a free camera movement actor.
- Maintain Reference to Camera Actor – After instantiating the Camera Actor, it maintains a reference to said actor for any other actor that may need access to it.
The reason why the Game Mode is responsible for the Camera Actor is because I don’t think that the movement of the free camera should be tightly coupled to the Player Controller. I haven’t decided if I’m going to implement multiple Player Controllers to represent fundamental changes in a player’s gameplay capabilities or not. If this were the case, and the free camera implementation were tightly coupled to the initial Player Controller, it would require additional refactoring to accomplish.
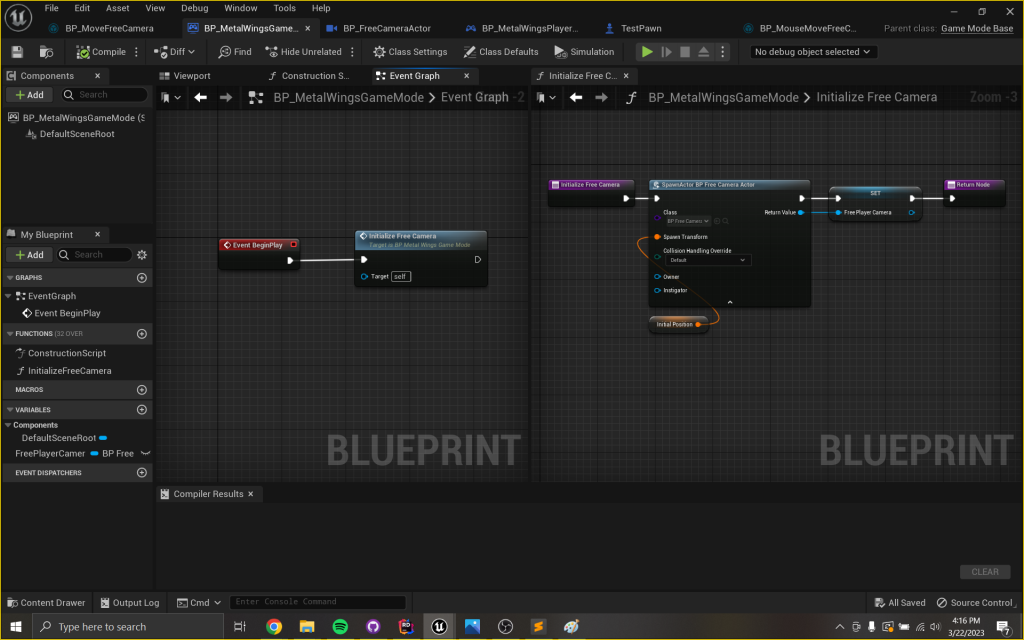
Game Mode
A quick look at the blueprint for the Game Mode asset. On BeginPlay, the function on the right is invoked which instantiates a free camera actor and then sets a variable containing a reference to said actor.
Player Controller
The Player Controller is implemented as a blueprint. Similarly to the Game Mode, it’ll become a C++ class if it starts to get out of hand. The key responsibilities of this part of the architecture are:
- Initialize Input System – Since I’m using the Enhanced Input plugin, the Player Controller automatically gets a transient Enhanced Input Component. The bit of logic that I’ve implemented is to add an Input Mapping Context containing the Input Action for free camera movement to this controller.
- Initialize Ability System – The blueprint already includes an Ability System Component from Unreal’s GAS. It adds the Gameplay Ability for free camera movement and also starts it by default.
The Player Controller is naturally in charge of initializing both the Enhanced Input Component and Ability System Component as it owns both of them. Going forward, I think it will continue to be responsible for adding and starting all of the different Abilities that the player is supposed to possess when the game starts. This way, the Player Controller will know what it’s able to do, but the exact nuts and bolts of what those things are will be abstracted away into Gameplay Abilities.
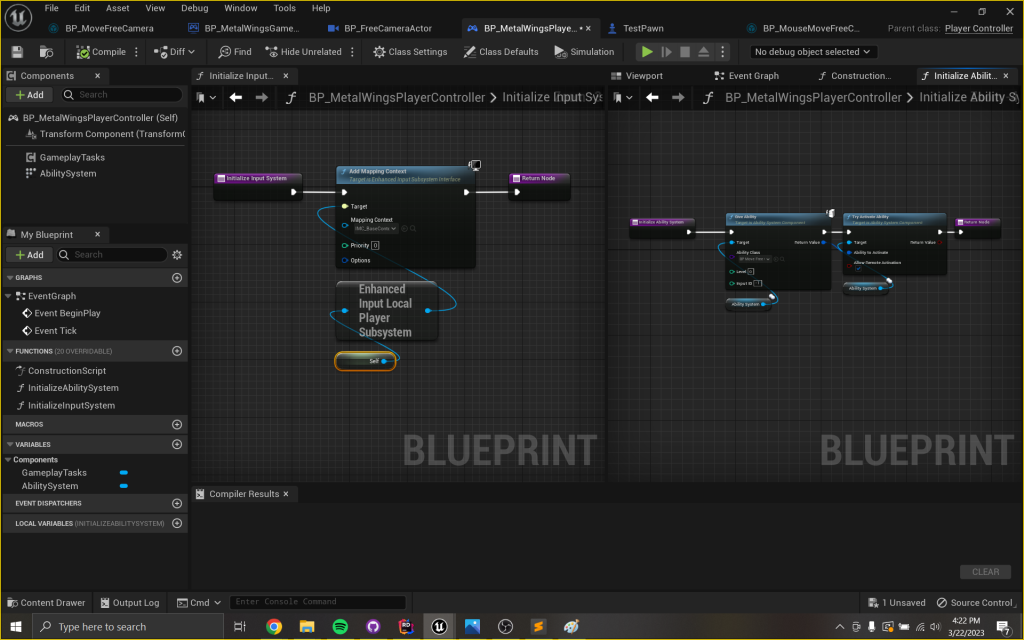
Player Controller
On the left is the function that initializes the input system, and the function on the right initializes the ability system. They get invoked in that same order on the BeginPlay callback.
Camera Actor
The Camera Actor is also implemented as (surprise) a blueprint. In general, I’ve tried to keep things that connect things together as blueprints, but things that perform any complex operations as C++ classes. This way, it’s (hopefully) easier to visually see how things are connected while keeping complex implementations abstracted away. The key responsibilities of this part of the architecture are:
- Own a Camera Component – One of the least complicated aspects of this feature. All this actor has to do is be the entity that owns the Camera Component and define the initial values for its exposed parameters. In particular, the initial position of the camera.
- Own a Movement Component – Again, all this actor has to do is own the custom Movement Component and define the initial values for its exposed parameters. In this case, the maximum speed, acceleration values, and movement boundaries for the free camera.
The reason why there is a separate Camera Actor instead of manipulating a camera that is placed directly on a Pawn is because the movement of a free camera is (at least to me) independent of the actual entity that the Player is attempting to manipulate. Additionally, the vertical slice spec does call for a follow-style camera as well, which would be easier to implement using a Camera Component that is actually on the Pawn. This way, it’s easy to transition between the free and follow camera modes by simply blending between the two camera poses. Finally, because the camera is not a child of the Pawn, it won’t be subject to relative movement due to the movement of the parent Pawn.
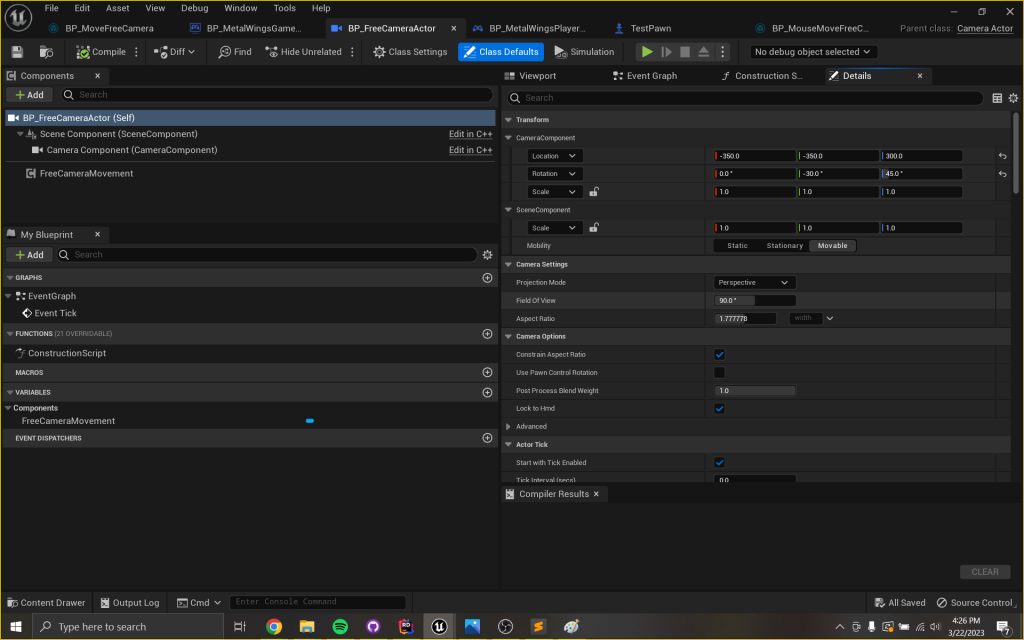
Camera Actor
You can see the components owned by the camera actor on the right as well as some of the configuration options available to the camera component on the right.
Input Action
The Input Action is a blueprint type defined by the Enhanced Input Plugin. It is responsible for the following:
- Abstract Away Player Input – All this blueprint does is abstract away the exact keys that are being pressed and transforms them into a normalized Vector2D that will be easier for code to work with.
Some of you may be thinking “This is just a vertical slice. Why bother with the Enhanced Input plugin?”. I generally find making tightly coupled bindings between inputs and game behavior to be very shortsighted. I don’t even think that it really saves a whole lot of time once you do understand the input frameworks that are available in a given engine, so I personally think it’s just super lazy and borne out of a desire to not have to learn a new input framework. Considering that I actually want to be employed and good at my job as an entry-level game designer where I’ll probably have to actually implement features I figure it makes sense to know how to actually leverage the framework.
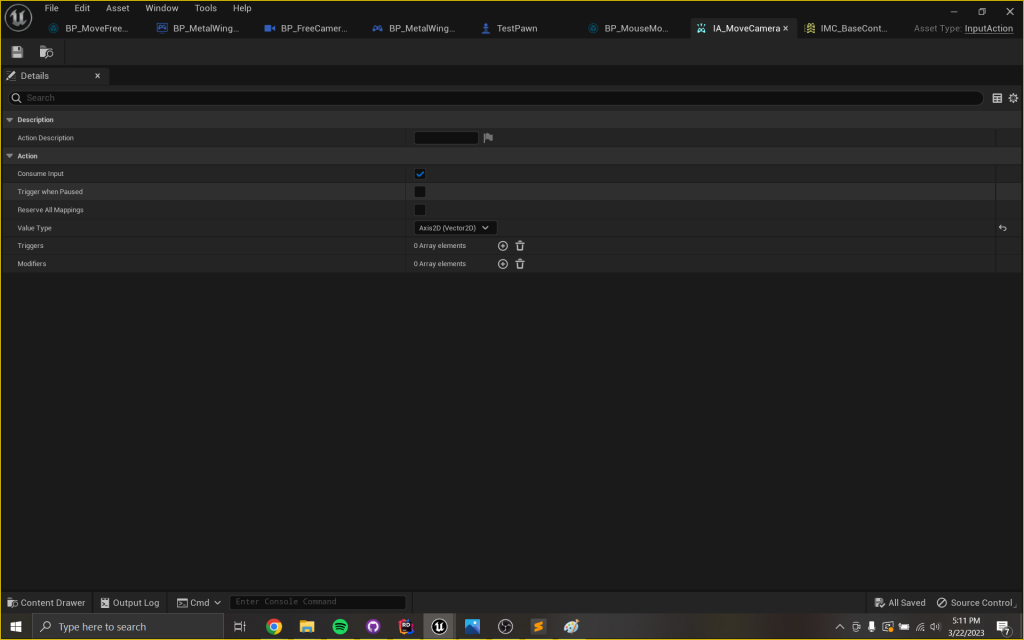
Input Action
The Input Action and it’s accompanying Input Mapping Context are both pretty simple. The Input Action itself is pictured above.
Movement Gameplay Ability
This Gameplay Ability is implemented as a blueprint type defined by the GAS and represents the player’s intention to move the camera. It is responsible for the following:
- Poll Player Input Value – The blueprint specifies a given Input Action asset to watch for an Input Action Value on its Owner. This is actually accomplished through a custom Gameplay Task which inherits from the WaitGameplayEvent Task that is implemented by the GAS.
- Send Value to Movement Component – The blueprint also specifies a target Movement Component that will receive an updated input vector each tick. This is also accomplished through the custom Gameplay Task mentioned above.
- Define Gameplay Rules for Free Camera Movement – The actual enforcement of the rules is generally to be accomplished via the GAS, but Gameplay Abilities need to define the conditions that must be or cannot be true in order for them to be activated. Since there are no competing types of camera movement, these rules are trivial, but this is where those rules will go.
Right now, the custom Gameplay Task I mentioned directly connects an Input Action to a custom Movement Component, but I think that I can actually abstract this away and move the definition of that connection to the blueprint. I think this would be desirable because it would reduce how rigid and coupled the implementation of the ability is without actually adding any meaningful complexity to the blueprint level. You can see the source code for the task here.
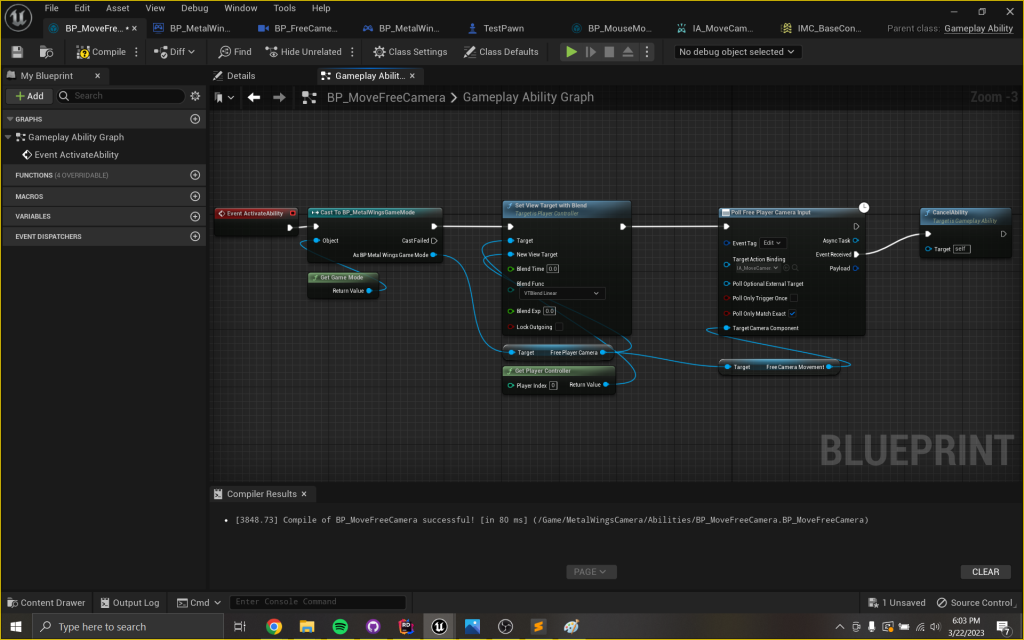
Gameplay Ability
The blueprint for the gameplay ability can be seen above. The Poll Free Player Camera Input is the custom task that’s mentioned. The ability gets started by default at the beginning of the game and the polling task pulls the input data as it ticks.
Movement Component
The custom Movement Component is implemented as a custom C++ class and specifically defines how the free camera movement should behave. It is responsible for the following:
- Calculate Updated Position – The class exposes a vector value that represents player input. It also exposes parameters to its owning blueprint for its maximum speed, acceleration, and movement boundaries. Using these, it computes the direction the player is trying to move based on the provided input vector and computes the acceleration to apply, updates its internal representation of velocity, and uses that to determine what the next position for the camera should be after this tick.
- Apply Updated Position to Camera – The class also applies this calculated position to the Camera Component that is present on the same actor.
This is probably one of the pieces of this implementation that I like the least. The boundaries for camera movement are pretty hard-coded in and don’t actually perform any validation on their values. Also, the boundaries make the assumption that the boundaries should be a box. For the sake of the vertical slice, this should be sufficient, but in reality, its possible more complex boundary detection will be needed. Second, I’m uncertain whether the polling timing for player input and the position updating for the camera are lined up correctly or even if their ordering is deterministic. Based on some quick playtesting, it seems fine, but might be something to check if there’s excessive latency or inconsistent behavior. The good news is that because its implemented as a component, it can easily be re-implemented and swapped out in the scenario that a complete re-work is needed. Also, it doesn’t use a reference to an Input Action Value because that would directly couple this movement behavior to the Enhance Input system, and would make it harder if I wanted to inject input values for some reason. You can see the source code for the component here.
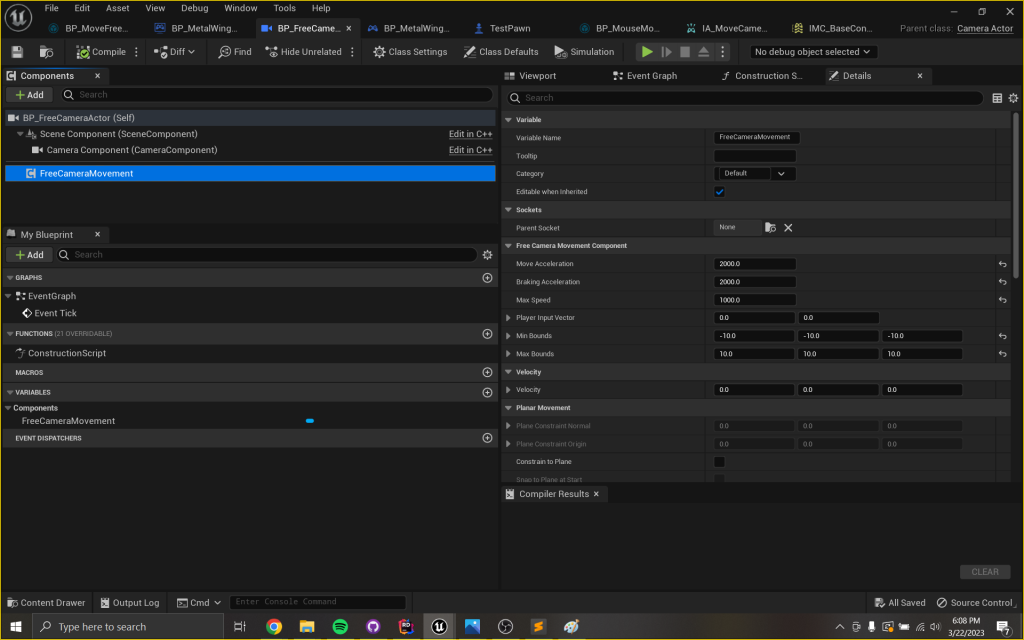
Movement Component
Here’s the Movement Component that’s owned by the Camera Actor. You can see the configuration options to the right.
Test Pawn
The Test Pawn is a Pawn blueprint. It is responsible for the following:
- Get Possessed by the Player Controller – This primarily exists so that it can be possessed by the Player Controller and avoid making Unreal lose its mind or try to provide me with a default Pawn that has actual additional behavior on it that I don’t want.
- Own a Camera Component – As I continue to flesh out the camera controls, I’ll eventually be implementing a follow-style camera, so having a Camera component on the pawn that follows the player model and can be blended to will ease this implementation.
This part of the architecture is thankfully quite simple.
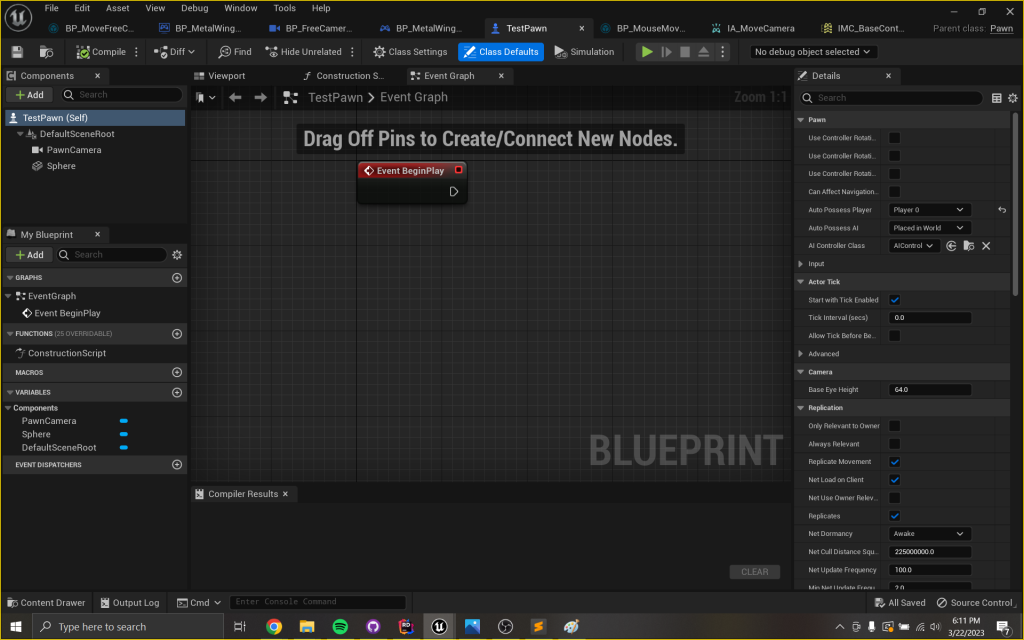
Test Pawn
As one can see, the test pawn is indeed, quite simple right now. It’s definitely not going to stay that way.
Project Organization
Finally, I wanted to review the structure of the project. I’ve been using Modules to separate the various pieces of my C++ code and to reduce compile times. Again, probably overkill for a solo project, but almost definitely will be used extensively in AAA development. The modules I currently have defined are:
- MetalWingsCore – This module contains any code that is core functionality for the game. Things should depend on MetalWingsCore, but not the other way around. It doesn’t contain anything meaningful right now, but if I were to implement the Game Mode or Player Controller as C++ classes, I would definitely consider placing them here.
- MetalWingsCamera – This module contains any code that relates to manipulation of the Camera. This is where all of the C++ code has wound up for this feature.
I’ve also attempted to organize my assets into folders following this structure. I’ve further defined sub-folders for Ability assets, Input assets, and general Blueprint assets. I’m not sure whether I’ll be able to maintain the same invariants between asset folders or not.